When you first get a Traeger grill, the first thing you need to do is put it together. Once your grill is fully assembled, you might be tempted to start cooking on it immediately. However, that would be a rookie mistake! Don’t worry, I was tempted to do the same!
Any respectable pitmaster will tell you: it’s imperative to season your grill before using it for the very first time. And NO, seasoning doesn’t mean adding salt & pepper to your meat before grilling it! You could be forgiven for thinking this though. But that’s not what it means in this context.
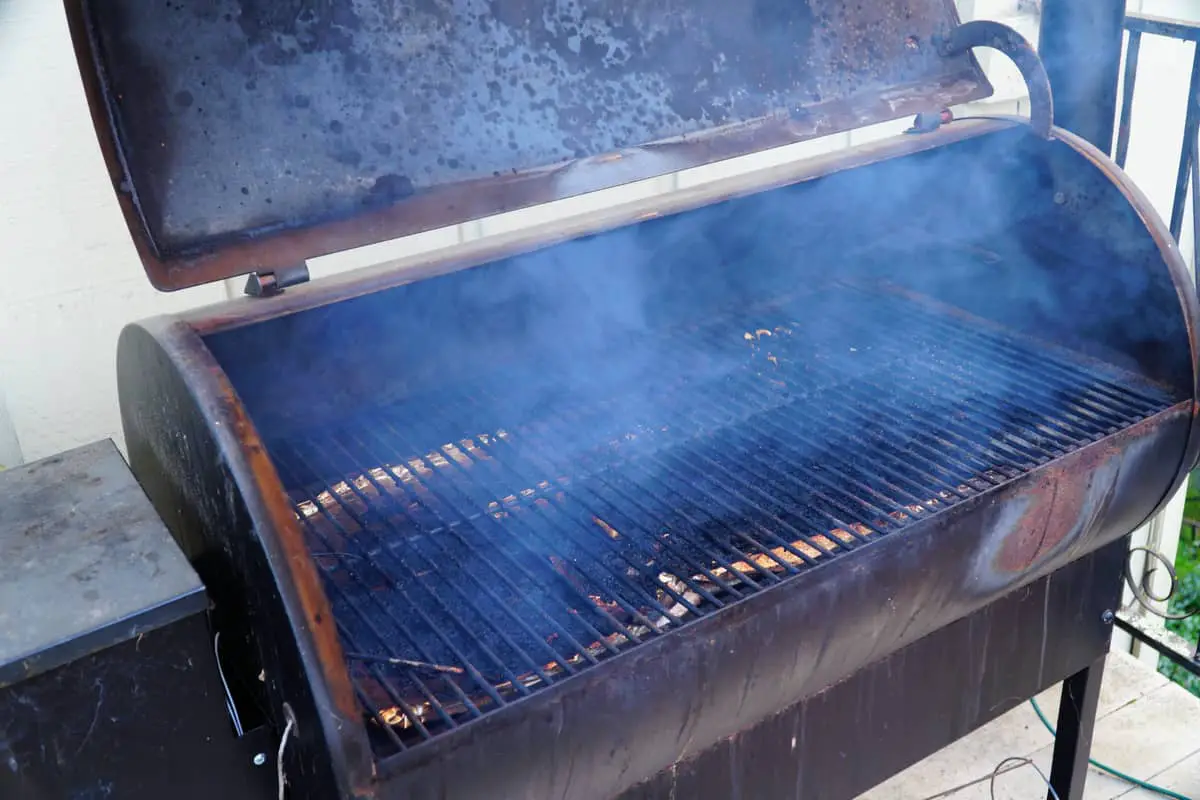
Seasoning your pellet grill – also called initial firing – is a process that burns off any chemical residue remaining inside the grill from the manufacturing process, all while creating a non-stick coating on your grill components (grill grates, drip tray, etc.) that will make grilling and cleaning easier. Seasoning your Traeger grill before first use is IMPERATIVE, not optional.
In the Traeger Seasoning Guide below, I’ll explain what I did to season the Traeger grill I got as a gift for my birthday. And, while the principle remains the same regardless of the model you own, the exact step-by-step process will differ slightly depending on whether your grill is WiFi enabled or not. Even though the process of seasoning a Traeger can seem daunting, it’s actually pretty simple. You’ll only need to do it once, and it should only take 60 to 90 minutes to complete.
Table of Contents
How to Season a Traeger Pellet Grill (step-By-Step Instructions)
Seasoning your Traeger grill is easier than you might think. But before you get started, you’ll need to identify what method to use.
The process for seasoning a Traeger grill with WiFIRE technology will be slightly different from the process for seasoning what Trager calls their “non-connected” models.
It blows my mind to think that we’re at the stage where even grills are connected to the internet…but that’s a whole other story!
How to Season a WiFire Traeger Grill
This is the type of model I own, so this is the seasoning process I followed. It’s more or less the same burn-in process that Traeger recommends. It worked for me perfectly, and my grill has been purring like a cat since day one.
Here’s a list of Traeger’s WiFi-connected models (non-exhaustive):
- Traeger Timberline XL
- Traeger Timberline
- Timberline 1300
- Timberline 850
- Traeger Ironwood 885
- Traeger Ironwood 650
- Traeger Pro 780
- Traeger Pro 575
- Traeger Century 885
- Traeger Silverton 810
- Traeger Silverton 620
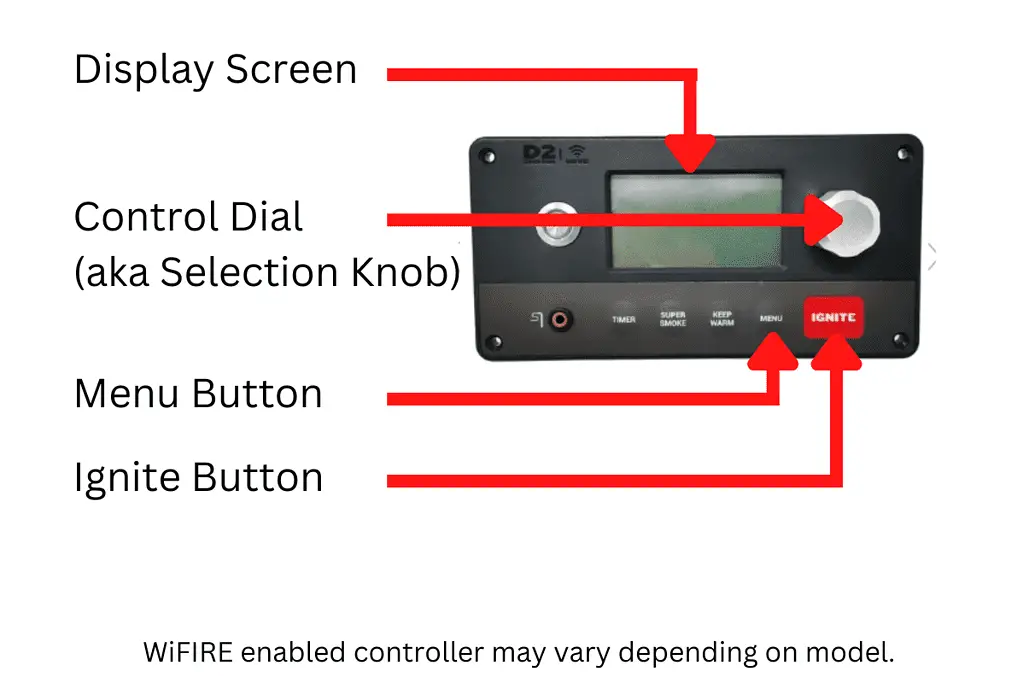
Here’s what the WiFIRE controller (WiFIRE control panel) on these models should look like (it’s actually a Touchscreen on the super-premium Timberline XL and Timberline models – but the principle is the same).
Step 1: Prepare Your Traeger Grill
First things first. Take the grates and the heat shield out of the grill. Place them to one side. This step will allow you to make sure that pellets are being fed into the firepot, by the augur, later on in the process.
Step 2: Plug in Your Traeger Grill
First of all, make sure your power switch is in the OFF position, marked by an “O” on the switch itself. Then, plug your grill into the electrical socket.
Step 3: Add Pellets to Your Traeger Grill Hopper
Open the hopper lid and pour in your choice of wood pellets. You don’t need to fill the hopper completely. About half full should be enough.
Step 4: Switch on Your Traeger Grill
Switch your grill on by flicking the power switch to the ON position, indicated by the “I” on the switch itself. The switch should light up.
Step 5: Wake up Your Traeger Grill Controller
In order to wake up your grill controller, press on the control dial (knob) located on the control panel area of your Traeger grill.
Step 6: Prime Your Traeger Grill Augur
To prime your augur, press the MENU button on the control panel.
Turn the control dial to “AUGUR” and press the knob to enter the augur menu.
Inside the augur menu, spin the dial to “Prime Augur” and press the dial again to select this action. Once you’ve done this the augur should begin to spin slowly, and after 10 to 20 seconds pellets should start to drop into the firepot. A countdown timer will begin on the display of the control panel.
Once the countdown is finished, press the dial again to return to the temperature selection screen.
Step 7: Reinstall Your Traeger Components
Before you go any further, reposition the grill grates and the heat baffle inside your Traeger grill. This way they’ll benefit from the burn-in process.
Don’t forget to close the lid at this stage.
Step 8: Set Your Traeger Grill to 350° F (180° C)
Turn the control dial clockwise until the display reads 350 degrees Fahrenheit (or 180 degrees Celsius if you’re outside of the US) and press to confirm.
Then press the red “IGNITE” button located next to the “MENU” button on the control panel.
Your grill will begin to heat up and a “Pre-Heating” message should be showing on the bottom of your digital display screen.
Let the grill do its thing for 20 minutes.
Note: When I got to this stage of the process, I noticed two things. First of all, the grill started to smoke profusely, which is what you’d expect of a pellet smoker…But, I also heard the occasional bang, thud, or creaking sound. At first, I was surprised, even a bit worried. I soon realized that this was perfectly normal. As the metal components of the grill heat up, they expand and may even slightly warp as they begin to “bed in”. In doing so, they create odd noises. So if you hear something similar, don’t panic.
Step 9: Set Your Traeger Grill to 450° F (230° C)
After the initial 20 minutes at 350° F (180° C), you’re going to ratchet things up. This means cranking the dial up to 450° F (230° C).
To do this, simply turn the control dial clockwise again until the display reads 450 degrees Fahrenheit (or 230 degrees Celsius if you’re outside of the US) and press it in to confirm.
Your grill will begin to heat up further and a “Pre-Heating” message should be showing again on the bottom of your digital display screen.
Let the grill run for a further 30 minutes. Once you’ve done this, the seasoning process is basically done. That was easier than expected, right? But, you’re not 100% finished just yet!
Step 10: Initiate Your Trager Grill Shutdown Cycle
Press and hold the control dial for 3 seconds to kick off the shutdown cycle.
A message will display on your display screen, indicating that the cycle has started and a timer will show how long is left for it to complete. This can take anywhere from 20 to 30 minutes, depending on the WiFIRE model.
Allow your Traeger grill to effectively shut itself down and once it has done this, the grill will be seasoned and ready for you to begin using it. As a side note, if you are planning to cook immediately after seasoning, you won’t need to turn the grill off, as you can alternatively just proceed to begin cooking on it.
How to Season a “Non-Connected” Traeger Grill
There are in fact 2 different seasoning procedures for “non-connected Traeger grill models. Which one you use will depend on what model you have.
Indeed, the control panels are different between the Traeger Pro Series models on one hand and the Traeger Tailgater and Traeger Ranger models on the other hand.
How to Season a Traeger Pro Series Model
Here’s a list of Traeger Pro Series models (non-exhaustive):
- Traeger Pro Series 34
- Traeger Pro Series 22
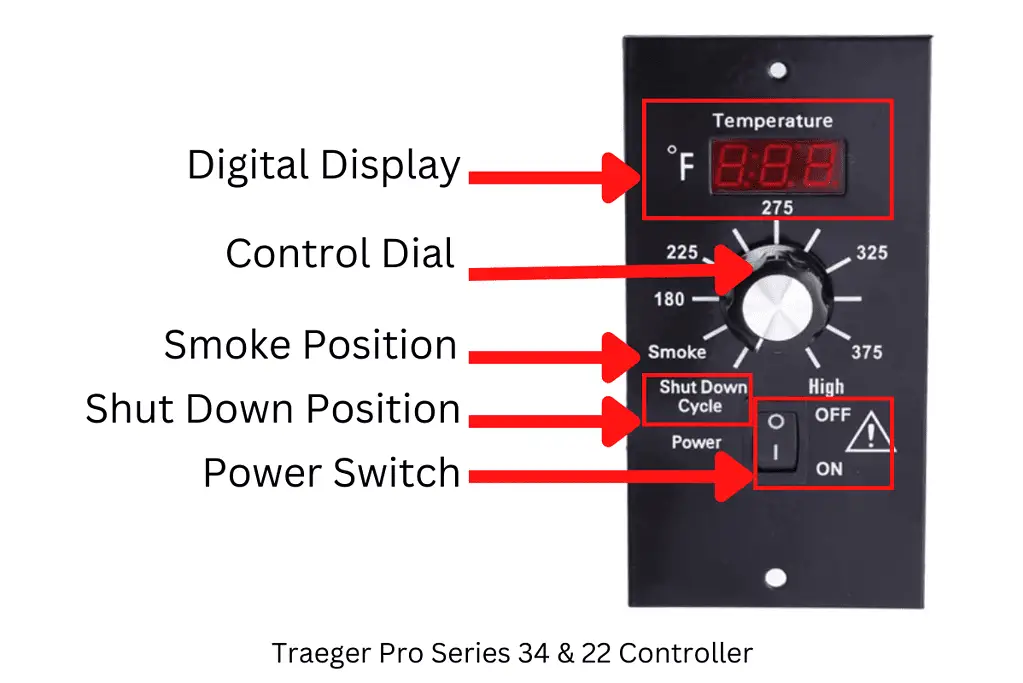
Here’s what the AC controller (AC control panel) on these models should look like:
Step 1: Prepare Your Traeger Grill
First things first. Take the grates and the heat shield out of the grill. Place them to one side. This step will allow you to make sure that pellets are being fed into the firepot, by the augur, later on in the process.
Step 2: Plug in Your Traeger Grill
First of all, make sure your power switch is in the OFF position, marked by an “O” on the switch itself. Then, plug your grill into the electrical socket.
Step 3: Add Pellets to Your Traeger Grill Hopper
Open the hopper lid and pour in your choice of wood pellets. You don’t need to fill the hopper completely. About half full should be enough.
Step 4: Switch on Your Traeger Grill
Switch your grill on by flicking the power switch to the ON position, indicated by the “I” on the switch itself.
Step 5: Prime Your Traeger Grill Augur
To prime your augur, start by opening the grill and hopper lid.
Then, turn the control dial clockwise to the High position for 2 to 5 minutes until you see pellets falling into the firepot.
Step 6: Shutdown Your Traeger Grill
This may sound counterintuitive at this stage, but you need to trust the process.
Initiate the shutdown cycle and once complete, shut the grill off by flicking the power switch to the “OFF” position, indicated by “O”.
Switching off the grill at this stage will make it safer to reinstall the components in the following step.
Step 7: Reinstall Your Traeger Components
Reposition the grill grates and the heat baffle inside your Traeger grill. This way they’ll benefit from the burn-in process.
Step 8: Set Your Traeger Grill to Smoke
Close the grill lid and hopper lid.
Switch the grill back on by flicking the power switch back to the “ON” position, indicated by “I”.
Finally, turn the control dial to the “SMOKE” position.
Let the grill run on this setting for 15 minutes.
Note: At this stage of the process, you may hear the occasional bang, thud, or creaking sound. As the metal components of the grill heat up, they expand and may even slightly warp as they begin to “bed in”. In doing so, they create odd noises.
Step 9: Set Your Traeger Grill to High
After the initial 15 minutes on the Smoke setting, you’re going to increase the temperature to High.
To do this, simply turn the control dial clockwise to the High position.
Your grill will begin to heat up further.
Let the grill run for a further 30 minutes. Once you’ve done this, the seasoning process is basically done.
As a side note, if you are planning to cook immediately after seasoning, you won’t need to proceed to Step 10 just yet to turn the grill off. You can simply begin cooking on it.
Step 10: Initiate Your Trager Grill Shutdown Cycle
Turn the control dial to the Shutdown Cycle position to kick off the shutdown cycle.
The cycle will begin and should take anywhere from 10 to 25 minutes to complete.
Allow your Traeger grill to effectively shut itself down and once it has done this, the grill will be seasoned and ready for you to begin using it.
How to Season a Traeger Tailgater or Ranger Model
The shutdown procedure below applies to the following non-connected models:
- Traeger Tailgater
- Traeger Ranger
- Traeger Trailhead
- Traeger Fremont
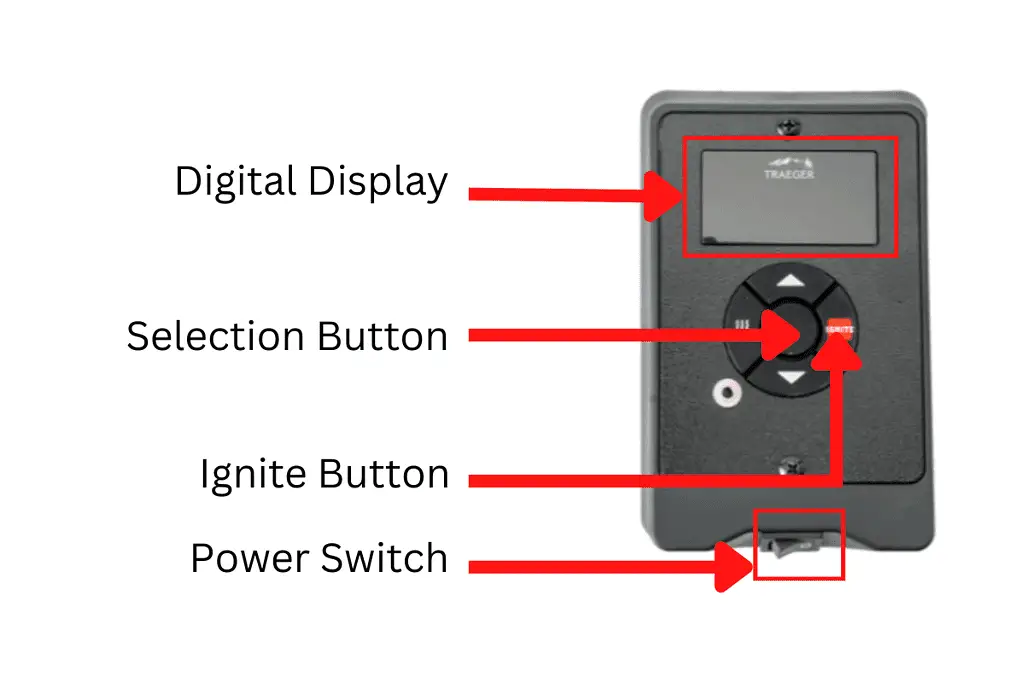
Here’s what the ARC controller (ARC control panel) on these models should look like:
Step 1: Prepare Your Traeger Grill
First things first. Take the grates and the heat shield out of the grill. Place them to one side. This step will allow you to make sure that pellets are being fed into the firepot, by the augur, later on in the process.
Step 2: Plug in Your Traeger Grill
First of all, make sure your power switch is in the OFF position, marked by an “O” on the switch itself. Then, plug your grill into the electrical socket.
Step 3: Add Pellets to Your Traeger Grill Hopper
Open the hopper lid and pour in your choice of wood pellets. You don’t need to fill the hopper completely. About half full should be enough.
Step 4: Switch on Your Traeger Grill
Switch your grill on by flicking the power switch to the ON position, indicated by the “I” on the switch itself.
Step 5: Prime Your Traeger Grill Augur
To prime your augur, start by opening the grill and hopper lid.
Then, select the High position for 2 to 5 minutes until you see pellets falling into the firepot.
Step 6: Shutdown Your Traeger Grill
This may sound counterintuitive at this stage, but you need to trust the process.
Initiate the shutdown cycle and once complete, shut the grill off by flicking the power switch to the “OFF” position, indicated by “O”.
Switching off the grill at this stage will make it safer to reinstall the components in the following step.
Step 7: Reinstall Your Traeger Components
Reposition the grill grates and the heat baffle inside your Traeger grill. This way they’ll benefit from the burn-in process.
Step 8: Set Your Traeger Grill to Smoke
Close the grill lid and hopper lid.
Switch the grill back on by flicking the power switch back to the “ON” position, indicated by “I”.
Finally, select the “SMOKE” setting.
Let the grill run on this setting for 15 minutes.
Note: At this stage of the process, you may hear the occasional bang, thud, or creaking sound. As the metal components of the grill heat up, they expand and may even slightly warp as they begin to “bed in”. In doing so, they create odd noises.
Step 9: Set Your Traeger Grill to High
After the initial 15 minutes on the Smoke setting, you’re going to increase the temperature to High.
To do this, simply select the High position.
Your grill will begin to heat up further.
Let the grill run for a further 30 minutes. Once you’ve done this, the seasoning process is basically done.
As a side note, if you are planning to cook immediately after seasoning, you won’t need to proceed to Step 10 just yet to turn the grill off. You can simply begin cooking on it.
Step 10: Initiate Your Trager Grill Shutdown Cycle
Select the shutdown cycle setting to kick off the process of shutting the grill down.
The cycle will begin and should take anywhere from 10 to 25 minutes to complete.
My Thoughts
Now that you have taken the time to read through the seasoning procedures above, I hope that you are feeling confident and ready to season your Traeger grill!
Even though each Traeger range and model has its own burn-in procedure, the principle is the same across all Trager grills – and indeed pellet grills. Thankfully it only needs to be done once.
Thanks for reading! And if you liked this guide, please consider sharing it.
Additional Resources:
- What Is A Traeger Grill?
- How To Start A Traeger Grill [A-Z GUIDE]
- How To Turn Off A Traeger [Shutdown Cycle]
- Do I Have To Prime My Traeger Every Time?